arrow icon-cart icon-email icon-facebook icon-g-plus icon-instagram No-Audio Pause icon-pin Untitled-1 icon-print icon-search icon-show-hide icon-tiktok icon-twitter Audio icon-youtube-play icon-youtube logo-mobile
EbonySlide
EbonySlide

Intro to Slide Guitar

Learning just a few simple techniques can open up a whole world of tone.

By Shawn Persinger

First things first: There is no one way (or correct way) to play slide guitar. Between materials — glass, steel, brass, ceramic and now Taylor’s ebony — and instruments — acoustic, electric, resonator and lap steel guitars — slide mediums are abundant. Add to that the range of artistic approaches — Leo Kottke puts the slide on his pinky and plays with control and finesse; Joe Walsh wears his slide on his middle finger, performs with reckless precision, and gets a stunning electrified tone; CeDell Davis was known for playing with a butter knife lodged in his partially paralyzed right-hand; and Hound Dog Taylor, playing as sloppily as a Jackson Pollock paint brush, sported a brass slide on his penultimate pinky (he was born with six fingers on each hand!) — and newbies to slide are probably left thinking, Where do I start?

Right here, of course! In this article I’ll share a few general guidelines to slide playing that will soon have you performing single-note licks and chordal phrases, and (if you’re so inclined) impart some techniques to refine your approach if you’re interested in a more urbane tone.

Disclaimer: This lesson will deal specifically with playing slide in standard tuning, which is less common than playing in altered tunings. Why standard? Because it’s arguably more practical for the slide “faker,” not much more challenging than altered tunings, and applicable — in regard to technique — to any tuning.

Which Finger to Use?

As I mentioned, you have choices as to which finger you put your slide on. My personal opinion: If you’re starting from scratch, use the pinky. This allows the other, unsheathed fingers to play chords, and unless you are dedicating yourself to single-note slide playing, this is highly practical. However, you should experiment with all your fingers and do what’s best for you.

When considering your finger options, one additional detail to keep in mind is slide size. A slide that fits snugly on the pinky probably isn’t going to fit on any other finger. Meanwhile, a relatively loose, larger slide will fall right off your littlest digit. Think of a slide fitting the way you would choose gloves or rings; it is best to physically try a variety of sizes before deciding on a final purchase.

Playing Triads

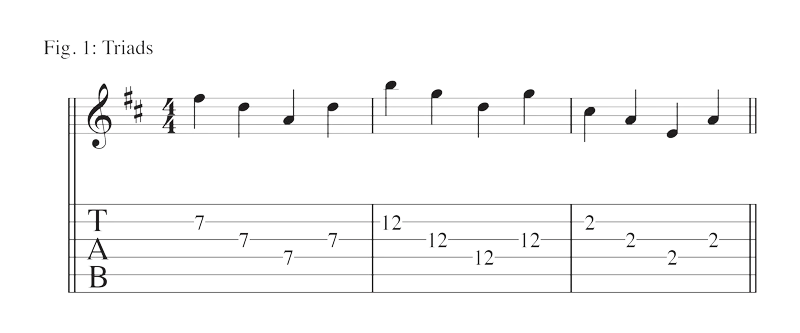
Once you’ve picked out a slide (or two), get to work putting it to practical use. Fig. 1 shows an easy way to play triads, which can be used for both single-note lines and chords, by laying the slide straight across the strings, aligned with the fretwire — that is, directly above the fretwire. Other than playing over the fretwire, this is the same shape you would use to play fifth-string-root barre chords, as notated in the chord diagrams.

When first starting out, play this shape without any sliding or vibrato — merely work toward a clean, properly intonated tone (more on intonation below). You’ll also want to experiment with the amount of pressure you use to apply the slide to the strings — too little and it will buzz; too much and you’ll rattle against the frets; just right and you’ll sound like Elmore James. Once you’re comfortable with this shape, you’ll find that you can now play all 12 major chords simply by moving to different frets. Personally, I find the lower frets, such as the A notated here, the most difficult to play comfortably.

With Fig. 1 under your control, it’s time to move on to Fig. 2, which truly brings the slide to life.

These subsequent three measures are the same triads as the previous three measures, except now you slide into the triads from a variety of different approach tones. For example, measure four approaches the F# from the E, which is a whole step below. Measure five approaches the B from C, a half step above. And measure six approaches the C# from a C natural, a half step below. But it’s important to know that one could intuitively approach from any other note — even from a pitch not normally notated in Western music, a “quarter tone,” which is a pitch halfway between the usual notes of a chromatic scale. Exploiting quarter tones is one of the major stylistic elements of slide playing, as the slide facilitates them better than any other guitar technique, and it’s utterly astonishing what a difference a quarter-tone approach can produce.

In addition to these approach tones, you’ll also want to start adding vibrato to these phrases. That said, I have not notated any vibrato in this lesson. That’s because, from this point forward, you can judiciously choose which notes you care to add vibrato to. To begin, I recommend emphasizing the last note of each measure. Still, the key word here is “judicious.” Just because you can easily add vibrato with the slide — simply move the slide back and forth (in the direction of the strings) relatively quickly — doesn’t mean you should do it ad nauseam.

Tips

Tips

Intonation

As I alluded to earlier, it is crucial to pay attention to your intonation, i.e., the accuracy of your pitch. Using the fretwire as your guide is helpful, though you should double-check your accuracy by frequently alternating the same phrase with the slide and then without. Fig. 3 is a valuable exercise to do this with, as it is created from half steps (notoriously the hardest phrases to play without getting “pitchy”), provides you with several variations, and is a practical turnaround lick that you can use when playing a 12-bar blues.

The first measure of this phrase is probably the most common way it is performed, using all three notes from the triad at once. But it is just as effective played one note at a time or using a combination of two. Practice these slowly, at different frets, and with a (wink) judicious amount of vibrato. The last measure of Fig. 3 will require you to fingerpick or hybrid pick, and is the most challenging of the phrases.

Tips
Slide Blues in Standard Tuning

Using a 12-bar blues to kick your slide playing into high gear is one of the most sensible places to start. This is demonstrated by Fig. 4, which is a 12-bar in the key of D that, for 12 relatively repetitive measures, possesses a wealth of information, technique and opportunity for variation.

Fig. 4 allows you to alternate (pretty much every other measure) between non-slide, fretted notes, and slide licks based out of our fifth-string barre-chord shapes. (To play this effectively requires you to wear your slide on the pinky or ring finger.) Once again, I have specifically notated the notes you can slide to and from in this example, as putting an arbitrary slide articulation leaves many students perplexed. Nevertheless, you should once again experiment with different degrees of slide articulation. And play close attention to the last two measures, as they provide you with the most complex phrase in this lesson, with a quick combination of fretted notes, single-notes with the slide, and a triad turnaround with the slide.

Tips
Damping

In my experience, almost every slide instructional book or video starts with the topic of damping — the muting of strings (in this context with both the left and right hands). While I do think this is important, I prefer to let students jump in and play. This is because so many of the incomparable blues guitarists from the 1950s and ’60s were unconcerned with damping. You can watch vintage films of Bukka White, Mississippi Fred McDowell, and many others playing fantastic, authentic blues without a care for damping, yet sounding better than any technique-conscious pedant ever will. So, while damping has its place, I believe music is the priority. This is why I have left damping for the end of this article.

Damping is a technique that can clean up your sound in general by keeping strings you aren’t playing from ringing sympathetically, which then allows the notes you are playing to resonate more. There are two basic forms of damping, one for each hand. For your fretting hand (for most players the left) you lightly lay one or more of your unsheathed fingers on the strings behind the slide. This basically looks as if you are playing guitar while wearing a mitten and can feel awkward and constraining at first, but trust me (for all my carping before), it does clean up your sound. For your picking hand, whether you are playing fingerstyle or with a pick, you gently lay the fingers you are not using to pick with on the strings you aren’t playing. That’s damping. It is both easier and harder than it sounds, and may or may not benefit your playing. You should practice it anyway.

One Last Thought

I think it’s worth mentioning that, as you move from slide novice to pro, you are most certainly going to bang your slide on the side of your guitar neck more often than you want. This is normal…for me anyway. As you progress, you will do it less frequently. Using Taylor’s new, lighter ebony slide will reduce the weight of the bang — much more so than a brass, steel, or even glass slide would. And it’s the sound of the bang, more than the actual impact, that will shock you. With that, I wish you well on your slide explorations.  

About Shawn Persinger

Shawn Persinger, aka Prester John, owns a Taylor 410, two 310s, a 214ce-N, an 8-string baritone, a 12-string 150e, and a GS Mini Bass. His original music has been described as a myriad of delightful paradoxes: complex but catchy; virtuosic yet affable; smart and whimsical. He currently plays in a “Laurel Canyon Sound” tribute band, playing slide guitar parts made famous by David Lindley, Lowell George, and many others. Shawn’s book, The 50 Greatest Guitar Books has been hailed as a landmark achievement in guitar education.