


The Taylor Expression System 2
The Taylor Expression System® 2
The Taylor Expression System 2 (ES2) is a revolutionary pickup design that delivers the latest in Taylor’s ongoing innovation in acoustic guitar amplification. The heart of the ES2 is Taylor’s patented behind-the-saddle pickup, which features three uniquely positioned and individually calibrated pickup sensors. The location of the sensors enables a more dynamic range of acoustic sound to be captured than ever before. Together with Taylor’s custom-designed “professional audio”-grade preamp, this system produces exceptional amplified tone and responsiveness. On stage through a PA, plugged into your favorite acoustic amplifier, or direct into recording software, the ES2 faithfully conveys the voice of your Taylor guitar.
The ES2 also operates through a proprietary 9-volt battery compartment and easy-to-use volume and tone controls.
Connections
The ES2 is designed to be plugged-in using a standard quarter-inch guitar cable, which will work in every circumstance: with an acoustic guitar amplifier, a standard direct box, or any other guitar-ready application.
Note: The ES2 is designed with different circuitry than previous versions of the Expression System and will not work with a balanced TRS jack. You’ll want to plug into a DI (Direct Input) box to convert to a balanced signal for long runs to a mixer or snake.
Tone Controls
Three soft-touch knobs allow for simple, accurate control of your guitar’s amplified tone. Using the knobs to adjust the bass, treble and volume will give you the ability to shape your tone considerably. We encourage you to experiment with different control settings.
All three controls on the ES2 are designed to indicate a center position, commonly known as a detent. By rotating each knob back and forth, you should feel a small “bump” at the center marker. For bass and treble, the center position indicates the “off” or “flat” mode. The center point of the volume knob indicates half of the highest volume output.
Control Arrangement
Volume: Closest to front of guitar
Treble: Center position
Bass: Closest to back of guitar
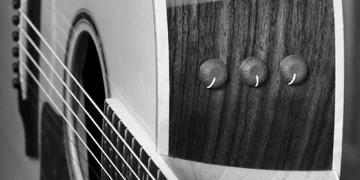
L - R: Volume, Treble, Bass
Tone-Shaping Control
The ES2 opens up new frontiers in sound, and will enable you to create a wide range of tones using simple adjustments of the onboard controls. The built-in equalizer reacts to subtle changes in bass, treble and volume, emphasizing individual characteristics of the guitar’s natural sound. Turning the bass or treble controls clockwise past the center detent will add bass or treble. Turning the same controls counterclockwise from the center detent will reduce bass or treble.
Tip for midrange control: Turning both the bass and treble up past the center detent will automatically create a dipped midrange. Turning both the bass and treble down and increasing the volume control will boost the midrange.
Plugging In
Follow these simple steps to set the proper volume and tone levels when you first plug in:
1) Turn all three controls on the guitar to the center detent position. In this position the bass and treble are flat and the volume is at the midway point.
2) Turn the volume knob on your amplifier or mixer all the way down. Plug in the guitar.
3) Set the tone controls on your amplifier or mixer to flat or a neutral position.
Note: Some acoustic guitar amplifiers do not have an active EQ (tone controls). If so, finding a neutral tone spot can be a bit more challenging but is not impossible. Setting all the tone controls on the same number is a good place to start.
4) Slowly raise the mixer or amplifier volume level to a comfortable level, then adjust the tone controls on your guitar to suit your personal taste.
Battery Usage
The ES2 requires one 9-volt battery. Taylor recommends Duracell® for optimal performance and long life. A new battery will provide 30-40 hours of plugged-in use. The ES2 conserves battery life using a standard, automatic on/off system. The pickup is in an “off” state until a cable is inserted, which activates the preamp. Removing the cable will return the system to “off” mode and conserve battery life. An LED battery life indicator is visible and located inside the soundhole on the preamp circuit board.
If your amplified tone begins to sound distorted, the battery most likely needs to be replaced. To change the battery, release the clip on the battery carriage (located along the tail line of the guitar) by pushing it toward the input jack. Remove the battery and replace with a new one, paying close attention to the positive/ negative orientation shown inside the carriage.
Tip: Batteries can leak if left unused for long periods of time. When you replace your battery, write the date on it with a permanent marker to track how long the battery has been in the guitar.
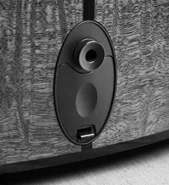
Phase Switch
A phase switch has been included on the preamp to help reduce low-frequency feedback should it occur in a live situation. The switch can be accessed through the soundhole of the guitar and is located on the side of the circuit board. If low-frequency feedback becomes an issue in live performance, changing the phase on either your amplifier or the guitar will help resolve the problem.

Pickup Adjustments
The ES2 utilizes three uniquely positioned, individually calibrated pickup sensors located behind the saddle. The individual pickup pressures are factory set and will likely only need to be adjusted if the saddle is being removed or replaced. Pressure on each sensor is controlled by turning the adjustment screws (visible behind the saddle; see photo below). The small, visible circles behind the bridge contain tiny adjustable arms. The small adjustment screws on top move the arms forward and backward, increasing and decreasing the pressure of the pickup sensors against the lower rear portion of the saddle, similar to pushing on a brake pedal in a car.
Note: The saddle should not be removed or replaced without first loosening the adjustment screws located on the top of the pickup housings. Otherwise the pickup could be damaged.
To remove the saddle: The pickup sensors must first be loosened (backed away from the saddle) by loosening the pressure adjustment screws located on top of the housings behind the saddle. The adjustment will require a .050 hex key (Allen wrench).
Turning the hex key counterclockwise 1-½ turns will back the sensor arms away from the saddle so it can be removed from the slot easily. Once the saddle is placed back in the slot, the pickup sensors can be reset with the saddle by turning them clockwise 1-½ turns.
Fine Adjustment
Very light pressure on the sensors is all that is needed to make the system work well. Changing the tension on the sensors will change the timbre of the sound and volume of the pickup slightly. Approximately one full turn of the tension screw is the maximum amount of pressure variance.
We suggest that any adjustments for sound be made using the following process:
1) Plug the guitar in and turn the volume up.
2) While plucking sets of two strings at a time, turn the adjustment screw associated with those strings (E/A - D/G - B/E) one turn counterclockwise until the sound of those strings diminishes. This will loosen the pressure on the sensor.
3) To engage the pickup for those strings, turn the screw back again clockwise ¼ turn at a time while plucking the strings until the sound of the strings returns. This will increase the pressure on the sensors. Repeat the process for the other string pairings (D/G - B/E).
Additional Note: The pickup system is held in place in the guitar by the pressure of the sensors against the saddle. If the pickup is accidently pushed out during saddle replacement, it can easily be put back into the bridge by pushing it up through the three pickup holes. The top of the pickup housing should be flush with the top of the bridge to be accurate.
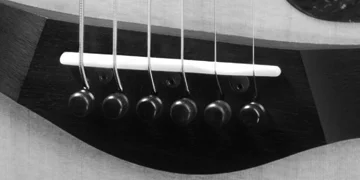
Three pickup adjustment screws are located between the saddle and bridge pins.
Customer Service
1-800-943-6782
Monday - Friday
8:00 a.m. - 4:30 p.m. PST
Our El Cajon, California and Amsterdam, the Netherlands Factory Service Center staff can help with any service, maintenance or repair questions concerning Taylor guitars.
+31 (0)20 667 6033
Monday - Friday
8:00 a.m. - 4:30 p.m. (CET)
1-800-943-6782
Monday - Friday
8:00 a.m. - 4:30 p.m. PST
International